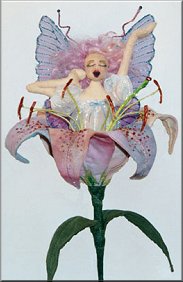
Lily
Flower:
Fold fabric
in half with RST. Lay petal template on dbld fabric. Trace around.
Mark opening. Repeat so you'll have six separate petals.
Sew on
tracing line around each petal. Leave open where marked. Cut out
leaving an 1/8" seam allowance around stitching. Turn each
petal to right side with hemostats. Press. Stitch or glue openings
closed.
On outside,
sew in two rows of stitching about 1/8" apart in center of
each petal from base to tip, to form casing for wire. With a large
needle or awl, poke a hole into the casing at base of each petal.
Take an 18" piece of the 22 ga wire and insert into hole
and push the wire through casing until end reaches tip. Repeat
for each petal.
Bunch
the petals together at the base and wrap all the wires with the
stem wrap tape from the base of flower down to ends of wire to
form stem.
Arrange
the separate petals so each overlaps the other slightly at the
base. Tack or glue together. Bend the wire within each petal so
the whole form has a cup shape and the petals recurve at the tips.
Dot on spots with fabric paint.
To form
the filaments and anthers of the flower, cut 32 gauge cloth wrapped
wire into 6 separate 6" pieces. Bend tips over on each to
form a kind of hook shape for the anthers.
Build
up layers of dimensional fabric paint over the "hook"
to cover the wire and make them appear as if they were laden with
pollen. Let dry.
Twist all the filaments together at base and insert down into
center of flower. Puddle a little fabric glue down into the base
of the flower to help hold the filaments in place.
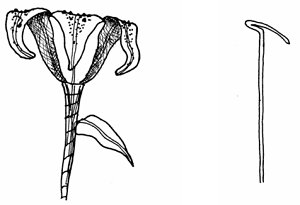
Leaves
Fold leaf
fabric in half with RST. Lay leaf template on dbld fabric and
trace around. Repeat for one more leaf. Sew on tracing line around
each leaf, leaving open where marked.
Cut out
using 1/8" seam allowance around stitching. Turn to right
side with hemostats. Glue or stitch openings closed. Sew in the
casing for wire like you did for the petals. Insert wire into
each leaf. Attach leaves to main stem of flower by holding leaf
base against stem and wrapping leaf wires to the stem with stem
wrap tape. Bend leaves as desired. Set flower aside.
Doll
Fold body
fabric in half with RST. Lay head, body, and arm templates on
dbld fabric and trace around each template.
Sew on
tracing lines, leaving open where marked on each piece. Cut out,
leaving 1/8" seam allowance around stitching. Cut very close
to stitching around thumbs. Clip seam allowance right up to the
stitching in the "U" where the thumb meets hand, and
in the crook of elbow on bent arm.
Use hemostats
to turn each piece to right side. (You may want to use tube turners
to turn the thumbs first, before turning the rest of arm.)
 Stuff
head and body by inserting stuffing through openings until uniformly
filled and firm. Close openings with ladder stitch.
Stuff
head and body by inserting stuffing through openings until uniformly
filled and firm. Close openings with ladder stitch.
Lightly
draw facial features on stuffed head with pencils and pens.
Seal face
with spray fixative and set aside.
Arms
Stuff
thumb on the straight arm. Stuff palm lightly. Cut a chenille
stem 1" shorter than arm length and insert. Stuff around
stem until arm is filled and firm. Close opening with ladder stitch.
Press
the bent arm flat. Top stitch from crook of elbow to the dot.
Stuff thumb. Stuff palm lightly. Cut a chenille stem 1/2"
shorter than the measurement from fingertips to elbow. Insert
stem into lower arm. Stuff around stem. Close opening in lower
arm. Stuff upper arm. Close opening and set aside.
Gown
and sleeves
Cut a
square of fabric 5 X 6". Press under 1/4" on the 6"
side and sew a row of gathering stitches on the turned under edge.
Sew the 5" sides together to form a tube. Slip on body with
seam in back and gathers across chest. Pull up gathering threads
and distribute fullness evenly. Stitch to body across top of gown
at gathers, front and back.
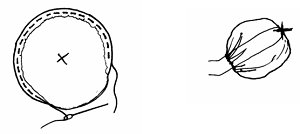
To make
sleeves, place sleeve template on dbld fabric. Trace around. Cut
out on tracing lines. Make a yo-yo for each sleeve by turning
under 1/8" all around edge of each circle and hand sewing
in a gathering thread.
Tack the
center of each circle onto the very end of upper arm. Pull up
gathering threads and poof out sleeve. Stitch to arm at gathers.
Pin arms
to shoulders so it looks like she's stretching. Stitch top of
arms on to shoulders right through the sleeve fabric.
Make a
small slit in head back right behind the seam at chin. Form cavity
in head with hemostats. Twist head down over neck stub. Attach
with ladder stitch.
Stitch
on pre-wefted hair or attach hair fibers to head with glue or
felting needles.
Wings
Take a
length of 32 gauge cloth wrapped wire and bend it all around the
drawn wing outline to make the basic form. Twist wire together
in middle and cut away any excess length from wire. Lay the piece
of organza flat on plastic wrap. Hold the wire wing form by the
center in one hand, and carefully apply a coating of fabric glue
with a brush to the entire form. Try to apply the glue to one
side of wire only. Set wing form tacky side down on the organza
and lightly press, making sure all areas of wire have firm contact
with the fabric. Let dry. Peel the wing form and fabric off the
plastic wrap, and carefully cut excess fabric from around the
wire. Cut right up against the wire. Embellish with dimensional
fabric paint or a wax/oil based crayon to make the veins. Use
a paintbrush to dab fabric paint on the wing edges to help hide
wire. Let dry thoroughly.
Tack the
wings to fairy at upper back.
Finishing
Bend the
filaments of the flower out of the way. Pull length of nightgown
up around bottom of torso. Bend lower wings in around body and
set the doll down into flower. Let the extra length of the gown
puddle around the body inside the flower. Push down and arrange
the excess to form a nest.
If you
want to fix the fairy into the flower permanently, lift her back
out and coat lower torso with fabric glue. Push her back in and
press down firmly until glue sets. Bend the six filaments into
a pleasing arrangement around the fairy. Trim stem of flower to
desired length.
Drill
a hole in the center of a pre painted wood base and wedge stem
into hole for display, or you can skip the base and add her to
other silk or dried flower arrangements for fun.