 1.
Trace the body and head patterns on to freezer paper using a peach
colored gel pen or marker.
1.
Trace the body and head patterns on to freezer paper using a peach
colored gel pen or marker.
2. Cut a section of fabric for
the body and head so you have 2 pieces slightly larger than the pattern
and lay them on the ironing board RST.
3. Using a warm iron, lightly
press the freezer paper shiny side down to the fabric. It will stick
to the wrong side of the top piece of fabric. Use a few pins to secure
both layers of fabric to avoid slipping.
4. Set your sewing machine for
a small stitch length, approximately 20 stitches per inch. Stitch
through the freezer paper and both layers of fabric. Leave the dotted
line area open for turning.
5. Peel away the excess freezer
paper. If it does not peel easily, you may have not used a small enough
stitch size. Re-stitch, if needed.
6. Trim to 1/4inch
around the head and body pieces, and clip curves. Peel away the rest
of the freezer paper. Save this piece and reuse it for another Pin
Doll Friend!
7. Apply Fray Check to the curved areas outside the stitching
at the nose, and turn RSO (right side out) while still damp. (If allowed
to dry, Fray Check stiffens and makes turning small items more difficult.)
Finish by turning the body the rest of the way RSO.
8. Fold under 1/4" at the opening of the body. With a
strong thread, like button and carpet thread, hand sew a running stitch
to gather the bottom, but do not tighten the thread or tie a knot.
Firmly stuff the body with poly-fil being sure to pack the neck solid
enough to "screw on" the head, and tighten the opening as
needed to keep the stuffing in place. When no more stuffing will fit,
pull the gathering stitch to almost close the hole and insert 1 copper
penny. Pull the gathering tight enough to hold the penny in place,
and stitch it closed. You may wish to add a touch of white glue to
secure the penny and the knot.
9. Stuff the head firmly. Make an indentation in the poly-fil
with your finger and insert the neck in the head. Turn under the raw
edges of the head fabric. Attach the head with small, nearly invisible
stitches.
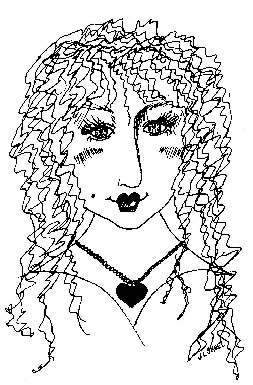
The
Face:
1. Draw with a Terra
Cotta pencil and a light hand. Any mistakes can be blended out to
look like shading. Draw 2 almond shapes for the eyes just above the
center of the face. Add two dots for nostrils 1/3 of the way to the
chin and a small line for the center of the lips 2/3's of the way
to the chin from the eyes. Detail the upper lip to include a small
"M" shape, the center lip line to look like a wave of water,
and the lower lip to curve down slightly, as shown.
2. Once the face
is drawn in with the pencil, use a brown .005-micron pen to define
the features, the iris's for the eyes, and a light sketch of eyebrows.
3. Draw the lip
line in with red or pink .005 micron pens. The corners of the mouth
never extend past the center of each eye. Color the top lip slightly
darker than the bottom lip with your favorite color marker or gel
pen. Be sure to keep the centerline visible so the lips do not become
a blob on the face. If the centerline disappears, you may draw it
back in after the ink has dried, using a .005 micron brown pen.
4. Draw and fill
in the pupil of both eyes with a black pen.
5. Add the iris
color to both eyes using a light gel pen. A dark color will be overpowering,
and the pupil will get lost. Add tiny flecks of a darker color to
the iris to add depth and detail to each eye with a fine point pen.
6. Add tiny eyelashes
with a brown .005-micron pen. If they don't show well come back after
the shading to do more, or use a brown .01 micron pen. I often make
two layers of lashes with curves that cross to add depth. It looks
like more lashes without being too bulky.
7. Lightly shade
the areas around the eyes, and nose as drawn with a terra cotta pencil.
Blend all these areas softly with a felt square. Be sure to avoid
blending the shadows into the detailed eyes.
8. Add a light color
of pencil as blush on the area shown. You may choose from pink to
peach, depending on the tone of your flesh fabric. Add a touch of
the same color on the chin, tip of the nose and forehead, for a sun-kissed
look. Blend all of these areas slightly with a small felt square.
9. Use a white gel
pen, white acrylic paint to make the whites of the eyes. If the white
covers any eye details wait until dry, then add back in the lost details.
10. Use a straight
pen to add 1 tiny dot to each eye for a spark of light. The dot needs
to be at the same location for each eye. If you think of each eye
as the face of a clock, the dot would be at the number 2 on each eye.
The gel pen will be transparent and need repeated to be several coats
of ink, so place a dot, do a little highlighting, then place another
dot, etc. until done if you prefer not to use paint.
11. Highlights should
be transparent over color. Highlight the following places using a
white gel pen or a white water color pencil.
a) The upper eyelid
just above the center of the eye on the lid, below the eyebrow.
Be sure the eyes match!
b) Draw one thin line up the center of the nose to the height
of the eyebrow.
c) A downward curve on the top of the cheeks.
d) A slight upward curve on the lower lip.
Look over the face and repeat
any detail that may look washed out from the layers of color and blending,
and adjust details as needed. Add eye make-up as desired. Brush on a
thin coat of Createx sealer, or lightly spray with workable fixative.
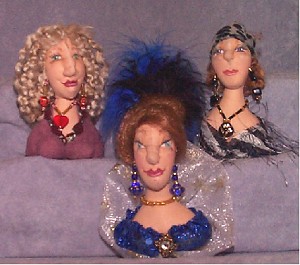
Clothes:
There is no set way to dress Penny, so be free and creative! No two
should ever look alike ~~ remember, this girl is lucky! Try draping
her with wide ribbons and fabric scraps. Pin them in place as you
like them, and lay various trims across her for embellishing touches.
You may choose to create a faerie and dress her with silk flower pieces,
feathers, ribbons, moss, lichen, cheesecloth, a small section of fur
and other "found" objects, Penny doesn't require a full
outfit so all those scraps you've been saving will be perfect to dress
her in! Be creative! When you like what you've pinned on, stitch it
in place with small hidden stitches, or use tacky glue to secure items.
Try adding yo-yo's made from coordinating fabric or pompoms to create
shapely breasts.
Hair:
Hair can be anything that strikes your fancy, (or the fancy of Penny!).
Hair can be tacked on by sewing a few stitches, or by painting the
scalp area with extra tacky glue and pressing the hair into the glue.
It will be easier to style the hair and keep it styled on a doll this
size. Keep in mind how you are dressing Penny, and coordinate the
hair. Ladies can have hair of any natural color or texture, but remember
it's okay to go wild and give her punk colors, as well! Hair suggestions
include yarn, wool, mohair, feathers, pom-poms, colored Easter grass,
frayed fabric, embroidery floss, pearl cotton, polyester fiberfill
(dyed or plain), silk flower pieces, buttons, trinkets, ribbons, fur,
and just about anything that will conform to the shape of the head.
If you use yarn you can
wrap some around the width of your fingers several times in to a wide
loop. This yarn as well as wool roving can then be laid in place around
the head at the hairline and twisted up into an elegant bun. Don't
forget to embellish her hairstyle with jewels, feathers or whatever
Penny says she needs.
Finishing
details:
 By
now, Penny is looking pretty good. All she needs is the final pizzazz.
You may add a few beads to the costume, or even a bit of glitter paint
on her eye makeup or cheeks to give her that "elegant lady"
look. Jewelry is a must, and can be simple gemstones stitched or glued
in place or detailed beaded drop earrings and ornate necklaces. She
may require a hat or a turban, which can be easily added by wrapping
ribbon and folding it randomly. I prefer to use wired ribbon for head
wraps, as they stay where I place them. If you add a hat or head wrap
be sure to add embellishments there as well, such as feathers or decorative
buttons.
By
now, Penny is looking pretty good. All she needs is the final pizzazz.
You may add a few beads to the costume, or even a bit of glitter paint
on her eye makeup or cheeks to give her that "elegant lady"
look. Jewelry is a must, and can be simple gemstones stitched or glued
in place or detailed beaded drop earrings and ornate necklaces. She
may require a hat or a turban, which can be easily added by wrapping
ribbon and folding it randomly. I prefer to use wired ribbon for head
wraps, as they stay where I place them. If you add a hat or head wrap
be sure to add embellishments there as well, such as feathers or decorative
buttons.
Finally, when Penny is
completely thrilled with herself, stitch a pin back high enough on
the back of her that she doesn't wobble and fall over when you wear
her. Then pin her on your shoulder and begin working on her friend.
Everyone needs a Pin Doll Friend!