Creating Sumptuous Ribbon Trims
By Marcia Acker-Missall
Several weeks ago a student of mine arrived in class and was very excited about her garage sale treasures of the previous weekend. Apparently she had landed in the midst 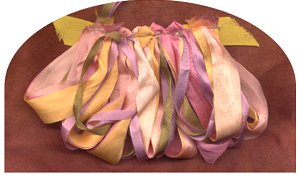 of a garage sale set up by someone once in the upholstery and decorative trims business. I was PLAID with envy as she displayed for us all several bundles of 5" length sample pieces of richly embroidered edgings and sumptuous gathered ribbon trims.
I fell in love with one particular ribbon trim design and after class I went directly to my studio stash of silk and polyester ribbons. and began to work on re-creating as best I could, this very beautiful and versatile ribbon trim design to use for my own work.
This trim is too lovely to keep secret in my own private treasure trove of embellishing ideas and I want to share it with all of you.
Materials and Supplies
-
Sewing machine & edge stitching or general-purpose foot
-
General sewing supplies
-
12" ruler
-
Pencil
-
Scotch tape
-
1 yard of ½" wide twill tape in a color coordinated to your selected ribbons
-
3 one -yard lengths of Sheer Chiffon or silk ribbon 7/8" to1" (22mm) wide
-
3 one-yard lengths of 100% silk, Chiffon or polyester ribbon 1/8" (3mm) wide
Note: Choose colors that will either coordinate, contrast with one another or create a soft monochromatic color way.
Example: 1 yd each of light green, dark green and mauve chiffon or silk ribbon 1" wide.1 yd light pink silk ribbon, and two 1 yd lengths champagne color; all three 1/8" wide
- Using scotch tape secure the 1 yd length of twill tape to your work surface.
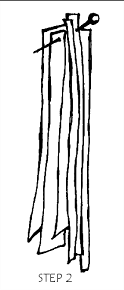
- Gather all 6 lengths of selected ribbons in 1 yd. lengths together and pin or baste together at one end. See illustrated step 2.
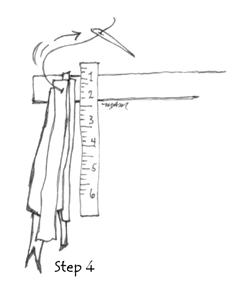
- Measure 1" in from the left side of the twill tape and pin or baste the ribbons to the twill at that point See illustrated step 4.
- Measure down from the top of the ribbons 2 ½" and mark with pencil. Measure down another 2 ½" and mark ribbon. At the first 2 ½" mark place pointer finger of left hand and press it down against the ribbon and work surface to keep ribbons in position.
- Loop the ribbons around a finger and Pinch the ribbons together tightly. Pin securely to twill tape and measure down from there 2 ½" as you did in step 4.
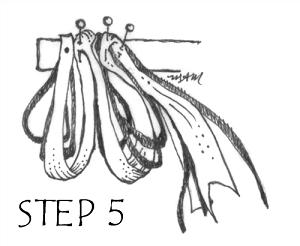
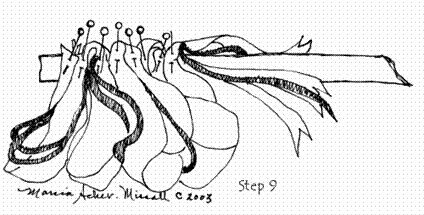
- Now, with right hand hold onto the 6 ribbons below the pointer finger at first 2 ½" point, loop the ribbons over finger and pinch ribbons together at the second 2 ½" mark. Bring the ribbons up to the twill tape. See step 5.
- Pin to twill tape about 1/8" away from where you pinned the ribbons in step 4 See illustration.
- Now repeat the above steps from #4 through #7.
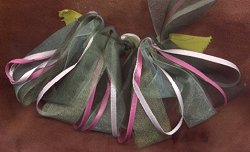
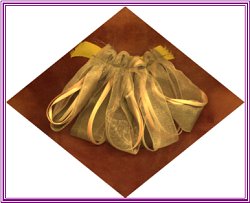
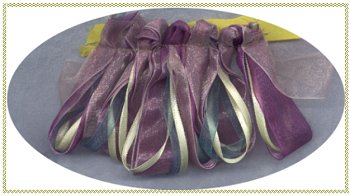
- Attach an edge-stitching or general-purpose foot onto your machine. Use matching threads in the bobbin and top spool and stitch the pinned sections of ribbon securely to the twill tape along the entire edge. You will be able to make from 5 to 6 ribbon loops creating a length of trim that is from 4" to 5" long. Increase your yardages accordingly. for trims in longer lengths.
|
|
Resources:
 There are too many fine ribbon resources in the market today to list them all here. Just to name a few I am listing those with whom I have had personal experience with to get you started in building your ribbon stash
Of course, your local quilting, needlework and embroidery shops should be your first place to investigate. For those of us in South Florida I suggest you visit Country Stitches in Coral Springs Suzanne's Quilts, West Palm Beach, and Quilter's Choice, Jupiter, and Quilters Marketplace, Delray Beach,
Visit your favorite on-line web sites for doll making, quilting and needlework supplies
FlightsofFancy- http://www.flightsoffancyboutique.com/cgi-bin/Store/store.cgi
SallyHoukExclusives http://www.picturetrail.com/sallyhoukexclusives
www.google.com search engine to locate more on line ribbon resources
 Bibliography:
A Passion for Ribbonry, Camela Nitschke, Martingale & Company Publishers
Embellishments A-Z, by Stephanie Valley , Taunton Press
Ribbon Trims , by Nancy Nehring, Taunton Press
The Art of Manipulating Fabric by Colette Wolff, Krause Publishing
The Artful Ribbon by Candace Kling, C&T Publishing
I hope that you have been inspired and motivated to experiment with creating new trims with which to embellish your work.
Look for more embellishing techniques from me in the next newsletter.


 of a garage sale set up by someone once in the upholstery and decorative trims business. I was PLAID with envy as she displayed for us all several bundles of 5" length sample pieces of richly embroidered edgings and sumptuous gathered ribbon trims.


 There are too many fine ribbon resources in the market today to list them all here. Just to name a few I am listing those with whom I have had personal experience with to get you started in building your ribbon stash
  Bibliography:

