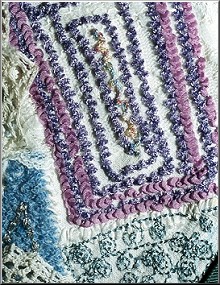
These instructions are useful in creating wondrous textures on clothing, Christmas stockings, crazy quilts and other quilt tops. Bobbin drawing is a fun and exciting technique to utilize any make or model of sewing machine. Simple instructions include methods of threading and using all common types of bobbins to get interesting results. Some needle threads that you can use are:
Just a few of the stitches that produce interesting effects:
Bobbin Drawing Bobbin drawing is the technique of producing a stitch design from the ribbon or thread you wind on the bobbin. The bobbin fiber is drawn up through the needle hole of the cover plate of your sewing machine by the needle thread. This produces a stitch on the back side of the fabric with the fiber you have wound onto the bobbin. So, to get interesting designs on the front of your fabric, we sew upside down - your bobbin fiber becomes the right side of your project. These stitch forms are interesting to use in the fiber arts. To allow the thick fibers to come through, we must by-pass the bobbin tension. Bypassing the bobbin tension is done in one of four ways depending on the type of bobbin set-up on your machine. Winding the Bobbin: Wind the fiber or ribbon onto the bobbin slowly and evenly. You can wind the bobbin by hand or hand guide the fiber onto the bobbin using the bobbin winder that is on your machine. Unwind and rewind, if necessary, to keep the fiber even. Cut off any tails that might be hanging from the bobbin. If your machine has a bobbin case, insert the bobbin into the bobbin case. If it does not have a bobbin case, put the bobbin in as you normally would, but do not put the fiber through the tension slot (see instructions for bypassing the bobbin tension). Pull the thick fiber up through the needle hole.
Making Stitch Samples Always test a stitch pattern before stitching on your project. Make test samples on two thicknesses of muslin weight fabric, writing on the fabric what your machine tension is set at and the name of the stitch. Make several rows of stitches at the same setting using different bobbin fibers and needle threads. You can often change the color of your design by changing the thread you choose to use in the needle. When doing your samples, start with the easiest stitches (straight, zigzag) and work toward the more complex stitches. Test your stitches with pearl cotton, Designer 6 or Ribbon Floss fibers before trying the more exotic fibers like silk ribbon and chenille. Pearl Crown Rayon and Designer 6 are inexpensive and nearly always have pleasing results. Do not hurry, pull or push the fabric under the needle. If you do, complex stitches (those that go backwards and forwards) neither sew nor show well and often stop the machine by plugging up the needle hole. Some of the complex stitches may bunch up on the back. You will then have to stop and clean the fabrics from the needle hole and you may break a needle. It may be (and often is) necessary to adjust the upper tensions of your sewing machine depending on the stitches and the fiber used and the effect that you want for decoration. When making a sample of your stitch, start with the upper tension on normal or auto. Gradually loosen or tighten the upper tension knob to make the stitch appear the way you want it. Each machine is different. Some sewing machines handle the thick fibers in alternative ways. For example, they may require that your machine be in a stretch stitch mode. When you have tested and chosen a stitch, test it on the fabric you are using for your project. You may use any kind or thickness of fabric, but you may wish to interface some fabrics to give body, especially if they are stretchy, sheer or loosely woven. Use a decorative thread or transparent thread in the needle because some of the needle thread may show in the stitch. Ordinary sewing thread does not look as pretty as a metallic or rayon thread. Use an appropriate needle to match your needle thread. Making Your Design You may want to make a planned design by drawing the design on the back of the fabric. Or, if your fabric already has a design you do not wish to stitch through, you can first stitch your design on the front of the fabric, then follow the stitching on the back when you do your bobbin drawing. Sew with the right side of the fabric face down on the cover plate of your sewing machine. As an alternate to a preplanned design, you may want to sew free hand, turning the fabric at right angles or making gentle curves to make interesting shapes. Ending Your Drawing From the back side of your fabric, draw the fiber thread through to the back, which is really the front, tie it in a knot and cut it off. If you cannot get the thick top fiber to the back, cut it off closely on the front and use Fray Check to keep it in place. Stitch Irregularities Despite your vigilance and care, oftentimes the thick fibers do not stitch as evenly as you would like them to. Don't worry. Sometimes these irregularities add texture and interest to your project. Often, I embellish the booboos with buttons, tassels, shisha, yo-yos and/or silk ribbon stitches. Special Effects Different stitch patterns can be achieved by using the extra long (basting) stitch available on some machines. The stretch stitches create different looks of a stitch when done with fiber. Copyright Orinda Spence, Helena MT-- 1995
Go to... Dollmaker's Journey A Doll Net Member Site by the Internet Visions Company. |
|||