General Instructions
Doll Materials Pattern
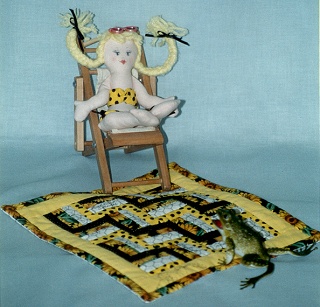
Template, Stitching and Cutting: [Hints I use good quality tightly woven cotton for the body. I use poly/cotton thread for stitching. A Turn-It-AllTM is a wonderful little tool for turning things RSO. When I mess up I throw the doll away rather than try to rip out all the tiny stitches.] Trace the pattern onto freezer paper and cut the template out. Iron it to the WS of one piece of body fabric. Use a light box or hold this piece up to the window and lightly trace the awake face with a fine pencil. Place the penciled side on top of the second piece of body fabric carefully stitch twice around the edge of the freezer paper template (20 stitches to the inch), leave open as indicated. Cut the doll out adding a 1/8" seam allowance. Peel the freezer paper off (if you are careful it can be used again). Clip and turn RSO. Stuffing: [Hints: Always use a good quality stuffing Mountain Mist TM or Fairfield TM When stuffing a small doll use small pieces of stuffing. Pack it firmly pushing from center out to sides. This way you can avoid the cellulite look.. Never stuff closer than 1-1/2" from the end of the extremities it you want the doll to sit. Use a chopstick or dowel for a stuffing tool. Insert a straw in the neck to keep it from bending.] Stuff legs and arms very firmly to right above the knees and elbows, very lightly stuff the rest. Machine stitch across the tops of legs and arms. Stuff the body firmly to the waist. Insert half a drinking straw into the upper body and neck. Stuff carefully all around the straw. Stitch the top of the head closed. Hair: [Hints: Keep the yarn scale in proportion to your doll.] Make 2" loops for bangs going to both back and front of head, stitching them to the top of the head seam forming bangs both front and back. Cut 15 pieces of yam, 24" long. Knot them at one end, braid the yam. Center braid on top of bangs across top of head and stitch it down over the center seam from ear to ear. Trim and add ribbons. Face: [Hints: Iron apiece of freezer paper to the back of a scrap of your flesh colored fabric and practice drawing faces with pens and marks before putting the final face on the doll ] Draw in the awake face with marking pens. Turn your doll over and mark the asleep eyes and mouth with pins, next draw them with a fine pencil and finish by using the pens. Add powdered blush for rosie cheeks. Bikini: Top, cut 4" of 1/2" elastic. Cut one piece 1-1/2" by 7" wide, fold RST and stitch long edges together, turn RSO and pull elastic through the casing (the fabric is longer so it gathers) Sew the elastic ends together, turn the ends of the casing under and butt them together and slip stitch. Slide the top up. over her hips and it becomes the bikini top. Tie a thread around at the center front and back to finish it off. Bottom, cut one piece 2-1/2" long by 6-1/2" wide. Repeat directions for the top without elastic tie around the center. Slide bottom onto doll, tack back and front together between the legs. Tie sides of suit with 1/8" ribbon bows. Fence Rail Autograph Quilt Directions: Materials and Cutting: Two 1" x 45" strips of black, dark print, muslin, yellow and polka dot for the blocks. Two 1-1/2" x 45 " strips yellow for border. Two 1 " x 45" strips for print outer border. One 13" x 13" piece of backing and batting. Stitching: Sew strips for blocks together. Cut them into 2-1/2" squares. Lay the quilt out and sew the blocks together in rows of four alternating the stripes horizontally and vertically. When the center is finished square it up. Add the borders vertically and horizontally trimming off excess fabric at the comers as you go. Layer quilt in this order, batting, backing right side up, quilt top right side down. Stitch the three layers together with a 1/4" seam leaving a three-inch opening on one side. Turn RSO and slip stitch the opening closed. Machine quilt in the ditch. Now it is all set to be signed in the border and the muslin strips. Suz was lucky enough to get Elinor Peace Bailey to sign her quilt have fun getting people to sign yours!!! © 1993, Andrea Perkins Sweet P's
Please CLICK HERE (http://DollmakersJourney.com/friends.html) to see more patterns from Andrea Perkins.
Go to... Dollmaker's Journey
A Doll Net Member Site by the Internet Visions Company. |
||||||||||||||||