Back to...
Dollmaker's Journey
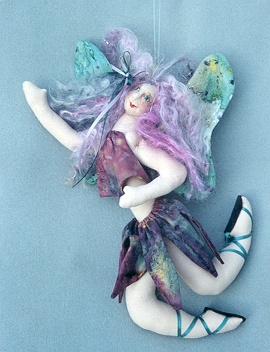
Callista
12" poseable fairie
by Donna Schramek
© 1997
5724 Pope Street
Baltimore, MD 21225-3718
Free Instructions and Pattern!
|
 |
Supplies for Callista
-
8" x 20" fleshtone cotton fabric for body
(easy recipe for dying unbleached muslin included at bottom
of page)
-
8" x 11 " for skirt
-
6" x 7" for bodice
-
small scrap of fabric and fusible webbing
for shoes
-
1 yard ribbon for shoes
-
8" x 20" cotton fabric for wings
-
a 26" piece of 24 or 32 gauge wire for wings
-
about 3 yards of fancy yarn for hair (may
also use wool roving or goatskin)
-
black or brown and red fine tip pigma pens
for face
-
acrylic craft paint for eyes
-
red Berol Prismacolor pencil for checks
-
matching threads for body, wings, and dress
(I prefer nylon upholstery thread for sculpting)
-
a length of monofilament line for hanging
-
Recommended: hemostats and stuffing fork for
turning and stuffing
Pattern
Click HERE for pattern.
Directions for CALLISTA.
BODY - Trace pattern
pieces onto body fabric. Mark the openings. With right sides together,
stitch body pieces. (Note -do not stitch across toe of legs) Press with
steam to set stitches. I feel this makes the seams stronger.
Cut out body pieces and clip inside sharp turns. E.g. inside elbow, behind
knee, above heel, at thumb. I prefer to cut small dolls with curves with
pinking shears. This makes a nice smooth seam when turned.
LEG/ARMS - After cutting
out legs, bring together toe seams and stitch across to give the foot a
flat shape. Then lay the legs flat with knees and toes pointing out (important)
and mark where you will make the slit for turning. This assures that you
will have a slit on the inside of both legs.
Turn body, head, arms, and
legs. Do not stuff body until legs are attached or she will have too many
behinds. Stuff head. Stuff arms and legs. A hemostat and stuffing fork
are most useful for stuffing narrow body parts. Stitch arm openings closed
with a ladder stitch or a tiny whip stitch. Close inside leg openings with
a whip stitch. Don't pull too tightly or she'll lose the fullness in her
hips and thighs and she needs this to form her behind.
 Put
a very small amount of stuffing in lower body. This should almost be flat.
Then attach legs to lower body by placing body in between legs and stitching
through from leg to body to other leg and back. Repeat two or three times
to squeeze behind together and then lock the stitch. There should be almost
no body showing in the rear and a small amount of body dipping down in
front of legs. Finish stuffing body (firmly at neck) and be sure to push
a little stuffing down into front to round out her belly. Close back opening
with tiny whip stitch. Attach arms by stitching through arm to body to
other arm and back as with the legs. Repeat two or three times and lock
stitch. Put
a very small amount of stuffing in lower body. This should almost be flat.
Then attach legs to lower body by placing body in between legs and stitching
through from leg to body to other leg and back. Repeat two or three times
to squeeze behind together and then lock the stitch. There should be almost
no body showing in the rear and a small amount of body dipping down in
front of legs. Finish stuffing body (firmly at neck) and be sure to push
a little stuffing down into front to round out her belly. Close back opening
with tiny whip stitch. Attach arms by stitching through arm to body to
other arm and back as with the legs. Repeat two or three times and lock
stitch.
HEAD - Stuff head.
Attach head by poking into stuffing to create a space and pushing down
onto neck. Neck Must be stuffed firmly so that you can "screw" head down
onto it. Turn head slightly to one side and pin in place. Stitch
onto neck with a small ladder stitch.
 At
this point, you can paint eyes and sculpt the head. For the eyes, place
a small dot of paint for iris. When dry, place a small dot of white on
either side of iris. Make a dot in center of eye for pupil. With a pin
tip, place a white dot for sparkle. After that is dry, with a fine brown
or black Pigma pen (.005 or .01) make an arch over the eye and draw a straight
line just under the iris. Pull down 2 or 3 eyelashes on bottom and 3 or
4 eyelashes on top. A small dash for eyebrows. For lips use a red Pigma
pen. Color cheeks with red Berol pencil or powdered blush. At
this point, you can paint eyes and sculpt the head. For the eyes, place
a small dot of paint for iris. When dry, place a small dot of white on
either side of iris. Make a dot in center of eye for pupil. With a pin
tip, place a white dot for sparkle. After that is dry, with a fine brown
or black Pigma pen (.005 or .01) make an arch over the eye and draw a straight
line just under the iris. Pull down 2 or 3 eyelashes on bottom and 3 or
4 eyelashes on top. A small dash for eyebrows. For lips use a red Pigma
pen. Color cheeks with red Berol pencil or powdered blush.
With a single strand of nylon
upholstery thread -
1) starting at back
of head, insert needle and come out through inside comer of eye - back
in at about the same place and out through inside comer of other eve -
back in at same place and out through inside corner of opposite eye - back
in at same place and out through back of head. Secure. This creates bridge
of nose.
2) Starting at back of head,
come out through outside comer of eye - back in at same place - out through
outside corner of mouth - back in at same place - out through outside comer
of same eye - then to back of head to secure. Repeat same for other side
of face. This creates cheeks.
3) Starting at a point where
the top of an ear might be, insert needle and come out below near where
head is attached to neck - back in at same place and out at starting point.
Secure. This creates a jaw.
FAIRY DRESS -
* Skirt -
1) With right sides together fold
3-1/2" up (lengthwise), leaving about 1" of fabric exposed (this will be
casing for the waist). On this fold, trace skirt hem. Stitch along traced
line. By ending the points very near the folded edge, you will eliminate
a lot of bulk when turning. Cut out, clip at turns, turn right side out,
and press.
 2)
After turning fold the straight edge down about ½" and stitch straight
across close to raw edge. This is the casing for the waist. 2)
After turning fold the straight edge down about ½" and stitch straight
across close to raw edge. This is the casing for the waist.
3) With right sides together,
stitch the back seam closed.
4) Turn right side out and
slip over Callista's hips. Secure thread at small of the back and starting
at center back seam of skirt, run needle through casing coming out again
at center back. Pull to desired tightness and lock the stitch in. Pull
center front of waist down a little and secure with a stitch.
* Bodice - With
right sides together, fold in half and trace pattern onto fabric. Stitch
where indicated, turn, press.
1) Starting at center
back of doll, insert needle into doll back between shoulder blades and
secure the thread. Run needle through top fold of bodice (as if it were
a casing) and come around to center back again and lock the stitch in.
Pull up a little at top center front and secure with a stitch.
2) Starting at center back
at lower edge of bodice, insert needle into body go through to front of
body coming out at the point where lower center front of bodice will fall
against body. Take a tiny stitch to secure center front of bodice to body,
return to back and lock the stitch. Stitch the lower back edge in place.
SHOES -
1) Trace shoe pattern
onto paper side of fusible webbing. Iron onto wrong side of shoe fabric.
Cut this piece out, peel off paper and press onto wrong side of another
piece shoe fabric. Cut out.
2) Place a dab of white
tacky glue onto shoe where indicated by an "x". Lay a 2" piece of ribbon
towards the back and lay a 12" piece of ribbon across the toe. Wait about
15 minutes for the glue to dry. Then fold the 2" piece of ribbon back onto
itself to form a loop. Wait a while until the glue is good and dry before
attaching shoe.  When
the shoe is ready to put on, dab some glue onto the inside of sole so that
it stays in place on the foot. Criss cross the toe ribbon on top of foot
and slip into back loop. Bring around to front of leg and criss cross around
to back. Glue in place at back of leg, trimming off excess ribbon. You
can embellish shoes with beads or flowers if you like. When
the shoe is ready to put on, dab some glue onto the inside of sole so that
it stays in place on the foot. Criss cross the toe ribbon on top of foot
and slip into back loop. Bring around to front of leg and criss cross around
to back. Glue in place at back of leg, trimming off excess ribbon. You
can embellish shoes with beads or flowers if you like.
WINGS -
1) Trace pattern
onto wrong side of fabric. Stitch around tracing, press, cut out about
1/4 inch from stitching.
2) Lay wire onto seam allowance
and with a wide, long zig zag stitch, stitch over wire, encasing it into
the seam allowance. Clip excess wire with wire clippers. Turn. This gauge
wire is easy to turn. After turning, smooth out wire with your fingers
and press again. (Optional - if you choose, you can embellish wing with
metallic top stitching or glitter paints.)
3) Gather up center of wing
slightly and attach to Callista's back. If you are flying Callista, you
can attach a length of nylon line or ribbon at top of wings.
HAIR - Fold approximately
3 yards of fancy yam to about 8" to 9" depending on fullness you desire.
Bunch loosely in center and on machine, sew a seam down center. Attach
to head with a few hand stitches and fluff out. You can mix in a few strands
of gold thread to add sparkle. You can also use wool roving or goat skin
if you prefer.
You can embellish wherever
you wish with ribbons, feathers, beads, bells, leaves, glitter or whatever
you can dream up - Let your imagination fly :-)
| Recipe for dyeing unbleached
muslin
1 package peach Rit Dye, 1 package rosy pink Rit Dye,
2 packages taupe Rit Dye.
Mix all 4 boxes together is a large mayonnaise jar. When
ready to dye, take 2 to 3 tsp of powdered dye and mix in a large jar of
VERY HOT water. Mix well to dissolve. Add this to a VERY HOT wash tub of
water and agitate to mix. Then add about 3 yards of WET unbleached muslin.
Run through a regular wash cycle (about 14 minutes) and rinse cycle and
dry in dryer. I do this all the time and have never ruined a load of laundry.
It seems to rinse clear. This recipe goes a long way and produces a nice
tan/peach flesh tone. I have also used it on pink fabric and got a pinker
flesh tone. Have fun with it. |
Please CLICK
HERE (/friends.html) to see more
patterns from Donna Schramek.
Callista
12" poseable fairie
by Donna Schramek
© 1997
5724 Pope Street
Baltimore, MD 21225-3718
Go
to... Dollmaker's Journey
A Doll Net
Member Site
http://TheDollNet.com
by the Internet
Visions Company.
|