Free Pattern
by Laurie S. Wagner
© 2006
Free Pattern Available as a PDF Download From
Our New Website... Click HERE!
Find More Mannequin Patterns of Families, Plus Sized Men/Women, Elves and Mermaids from Miniatures (3”) to Large (24”) Dolls by Laurie Wagner Click HERE!
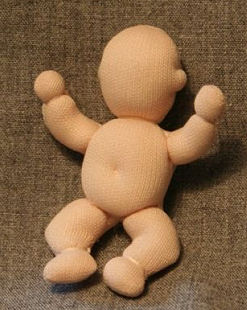
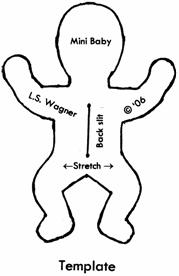
Mini Baby Mannequin 1/12 Scale
The youngest member of the “Miniature Mannequins” family, this 2” baby is made from Dolskin knit fabric, has needle sculpted details, but no wire armature. Easy to make; basic sewing skills.
Materials & Tools
- Dolskin knit fabric, scrap
- Matching thread
- Sewing machine needle for knits
- Needle and thread for hand sewing
- Freezer paper
- Fray check
- Stuffing – wool or Fiberloft
- Forceps 5” for turning & stuffing
|
- Scissors with sharp points
- Face colouring:
- Pigma pens .005 brown, pink
- Prismacolor pencils for lips and cheeks
- Acrylic paints, white and black
- Paint brush, very fine
- Krylon Workable Fixative spray
|
Permission for Use:
The purchase of this pattern includes permission to make and sell a limited number of finished dolls, giving credit to the designer. The dolls must be made entirely by you, and not manufactured. This pattern may not be reproduced for sale or use by others. Copyright 2006.
Laurie S. Wagner
Sewing
Because this doll is so small, accuracy is important to achieve the intended size and shape.
- Trace the pattern onto freezer paper with a fine point pen. This is a template, so the pen line is the stitching line.
Cut out the pattern, carefully removing the pen line.
- Fold the fabric right sides together.
Iron the template onto the wrong side of the doubled fabric, medium heat.
Be sure thatthe most stretch goes across the body, not up and down.
Put a pin in the middle of the pattern through both layers of fabric to prevent shifting.
Do not cut out yet.
- With a very fine stitch, sew around the template, leaving no opening. Sew slowly, almost touching the paper, lifting the presser foot on the curves to avoid stretching the fabric.
- Cut out leaving 1/16” seams. Peel the pattern off carefully; it is reusable.
Clip curves at underarms and neck. Put a bit of fray check at each clip and in the crotch area to prevent fabric from running.
- Cut the slit in the center back, being careful not to cut the front. Put fray check at the top and bottom. Let dry. Turn body right side out through the slit, using the forceps.
Stuffing
Body should be soft but firm. Use a type of stuffing that packs easily and is not too springy, such as wool or Mountain Mist Fiberloft.
Use forceps to position small bits of stuffing. Use a fine strong needle to poke through the skin and move the stuffing around to smooth away any bumps.
- Head: Place a wad of stuffing into the head, making it nice and round.
- Arms: Stuff the hands lightly. Use a needle to move stuffing to the tip. Stuff the arms.
- Legs: Stuff the feet with a tiny wad. Continue stuffing the leg and the buttocks.
- Torso: Stuff the neck and body, rounding the chest and stomach and filling out the hips.
- Close opening : Use a fine needle and doubled sewing thread to stitch the back closed with tiny ladder stitch and 1/16” seam. Start at top and work down. Knot the thread, cut.
Needle Sculpting
Use a fine needle and doubled sewing thread. To tighten, pull on the thread, not the needle. Always bury the end of the thread before cutting it. Anchor thread with a small backstitch or knot.
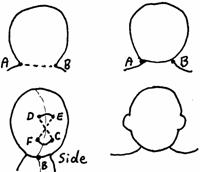
1. Chin : Anchor thread at A. Wrap thread all the way around the neck, and re-enter A. Exit B. Pull gently to form chin. Anchor thread. Do not cut.
Ears: Re-enter B, exit back of ear C, about 1/16” from seam. Anchor thread, re-enter C, exit D, enter E, exit F, enter C, exit D. Pull gently to tighten. Anchor thread. Re-enter D, exit on other side of head at back of ear C. Stitch second ear. Knot and cut thread. |
|
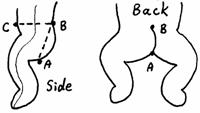
2. Buttocks and navel: Anchor at crotch seam. Enter A, exit back at B, enter A, exit B. Pull thread to form buttocks. Anchor thread, re-enter B, and exit front at C. Enter slightly below C, exit B. Pull thread gently to indent navel. Anchor. Don’t cut.
|
|
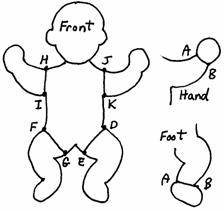
3. Hips & Shoulders: Re-enter B, exit hip D, anchor thread, enter E, exit D, enter E, exit other hip F. Pull thread to tighten. Anchor thread.
Enter G, exit F, enter G, exit F. Tighten, anchor thread. Re-enter F, exit shoulder H. Anchor.
Enter I, exit H, enter I, exit other shoulder J. Tighten, anchor. Enter K, exit J, enter K, exit back of neck, tighten, knot and cut.
|
|
4. Wrists and ankles : Anchor thread at seam A. Wrap over inner wrist or ankle, enter B, exit A. Pull gently, knot and cut.
|
|
Face
Use a light touch with the pens. You can darken the line by going over it again, rather than by pressing harder.
- Draw eyes, eyebrows, and nose with brown; draw mouth with pink.

- Paint white of eye with acrylic paint. Let dry.
- Paint iris with black paint. Let dry.
- Paint white highlight in iris.
- Blush cheeks with Prismacolor pencils.
- Spray face with fixative.
Hair : Use embroidery floss, viscose, silk or wool fibre. Stitch, glue or needle felt to head.
|
Free Pattern Available as a PDF Download From
Our New Website... Click HERE! |