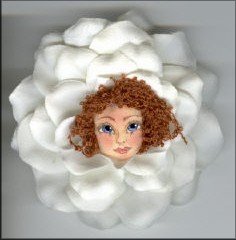
-
3"-3
1/2" silk flower (or several)
-
Low
temp hot glue gun & glue
-
Scrap
of fine yarn for hair (I used Lil' Loopies by One & Only
Creations, available from crscrafts.com and sometimes at Michaels)
-
Pin
back (craft stores)
-
Acrylic
paint blue, white, black, clear varnish
-
Micron
pens fine point brown and black
-
Red
or pink colored pencil for lips
-
Terra
cotta colored pencil for shading
-
2"
x 4" flesh colored muslin
-
Powdered
blush for cheeks
-
Heavy
thread
-
Small
amount of polyfil stuffing
-
Air
eraseable pen (quilt shops)
-
Small
piece of freezer paper
-
Krylon
fixative spray (craft shops)
-
Small
round paintbrush
Place
freezer paper, shiny side down, over head pattern and trace. Cut
out, leaving a margin of at least 1/4" all around. Fold muslin
in half and with a dry iron on wool setting press the pattern
(shiny side down) to the fabric. Set your sewing machine to very
short stitch (20 per inch) and sew around the head exactly on
the traced line. Leave open at top where indicated. Carefully
tear off the freezer paper on the outside of your stitches, then
carefully remove the pattern piece from the muslin and you'll
be able to use it again. (And again!) Press. Trim seams to 1/8"
and turn right side out. Cut across top even with stitches. By
hand, with heavy thread, sew a running stitch around the top opening
about 1/8" from edge. Do not fasten off.
Place
a flat layer of polyfil in the front of the head. Holding your
head face side down, continue stuffing on top of the first layer.
This will assure that your face is smooth and any lumps will be
on the back side. Stuff the head very firmly, pull up the running
stitch tightly and fasten thread, don't cut. Poke the raw edges
down into the head through the center of the gathers (I use manicure
scissors or a nut pick) and hold with a couple stitches over the
top of the hole.
With
your eraseable pen, draw the features onto the face. Trace lightly
with very sharp terra cotta pencil. Wait for the purple lines
to disappear or spritz lightly with water and dry with a hair
dryer. Mix two drops of white paint with a drop of textile medium
and mix well. With small round brush paint the entire eye area.
When paint is dry, paint in the iris with blue paint. Add white
paint to blue and paint a light highlight in a half moon shape
at bottom left of each eye. When iris is dry, paint pupil with
black. Dry. Carefully paint only the pupil with a small amount
of clear varnish and let dry (it has a tendency to bleed, so don't
brush onto the iris). When the varnish has totally dried, spray
with Krylon fixative. Trace around the iris and along the top
lash line with black Micron pen. With brown pen, draw in the crease
at the top of the eyelid, the eyebrows, nose, and lips. Shade
with terra cotta pencil around eyes, sides of nose. Using pencil,
color in lips. Blush her cheeks with a cotton swab and powdered
blush. Spray with Krylon. Paint another coat of clear varnish
over eyes. When dry, add the pupil highlight using the eye end
of a needle dipped in white paint.
Wrap
the yarn around your fingers 10 or 12 times. Tie at center with
piece of yarn. Glue to head where front hairline would be. Arrange
around the face. If there is a round plastic piece in the center
of the flower, pull it out. With hot glue, glue the face in the
center of the flower. Remove the flower from the stem. With a
craft knife, trim the plastic on the back of the flower to create
a flat surface. Attach pin back with hot glue.
Click
HERE to print Pattern.
Click
HERE to see more patterns by Jevne Eilts.


