|
|||||||||

Click HERE for What's New! |
|||||||||
Download Patterns (PDFs) Available On Etsy ... Click HERE! |
|||||||||
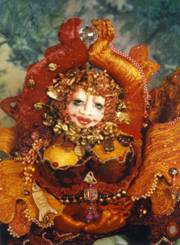
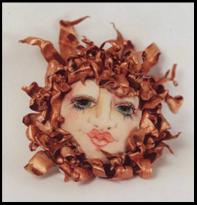
Tyvek - Create and Embellish With It By Marcia Acker-Missall C2004/05
The excitement about using Tyvek comes when you apply heat to its surface which causes it to curl, warp, stretch, and bubble and distort into surprisingly imaginative shapes. The colors used to paint the surface also react to the heat resulting in a broad variety of color intensity and texture depending upon whether the colorant used is flat acrylic paint or acrylic metallic paint, ink water colors and so forth. For the past several years I have been making my own metallic and colored Tyvek and I will share how I do this with you. I have taught my workshop classes how to create their own uniquely colored Tyvek to coordinate with their doll's costuming, altered book decorating projects and what ever fanciful creations the imagination brings to mind. The sunburst hair of my SPA GODDESS pattern & workshop doll pictured above is all created with a golden metallic Tyvek that I have painted myself. I have also used Tyvek as embellishment elements on my PIPPY WHIMZEE SPRITE & LADY GWENEVERE art doll workshops. I use various types of Tyvek that are easily available for purchase at office supply stores and several arts and craft web sites: There is Tyvekfilm, a fibrous film that looks and feels much like a paper product. It takes to all sorts of manipulations extremely well. It will stand up to all kinds of sewing, painting, stamping, cutting, rolling and you can toss it into the washing machine or wash it by hand and crinkle it up. It comes in 3 different weights which are light, medium & heavy. There is also Tyvektex which is soft to the touch and has more of the characteristics of fabric. It is softer than Tyvekfilm. You can easily hand stitch through it in addition to using the sewing machine. You can do all the things to it that you can do to the Tyvekfilm. NOTE- None of the above pertains to construction grade Tyvek that you see being used on buildings. I am not advising you to use this product. Here is a small project to experiment with to get you started SUPPLIES 1- Tyvek sheets 2- 1" wide sponge type brush and a bowl of water, rags or paper towels for clean up 3- Paper scissors, heat gun and or a dry iron, hemostat or tweezers to hold the Tyvek when heating 4-parchment paper or non waxed sandwich papers 5- Covering for work surface with plastic or newspapers. 6- Affordable Craft level Acrylic paints such as: FolkArt, Delta Ceramcoat, Apple Barrel, DecoArt, Tulip & similar brands. Here are but a few of the many colors available in Metallic paints: FolkArt brand - #660 Metallic Pure Gold, #657 Metallic Regal Red, #658 Metallic Antique Gold look also for Brass & silver. Delta Ceramcoat brand paints- All Metallic colors in this brand line work very well. DecoArt brand- "SoSoft "Fabric Paint Metallic brand Colors: Imperial Gold, Silver Platinum, Christmas Green, Plum/Prune. Look for many other metallic colors. All of these colors dry soft and pliable on certain types of Tyvek & most Fabrics. Delta brand/Starlite Dye & Starlite-"Shimmering Fabric Colors- #10402 Gold, #10438 Sachet Pink and many other shimmering colors in this group Tulip brand- Ultra Soft fabric paint- Metallic Jade, Metallic Copper. 7- Ironing board or similar surface. 8- sewing machine, top stitch needle & embroidery foot, threads and fibers are optional. Note-I do not recommend a series of acrylic paints called "Gleams" for this use. Their consistency is thin and do not give much coverage on the Tyvek. They would be lovely as an over glaze painted over another color. GETTING STARTED Paint both sides of the Tyvek in a free flowing composition. Paint heavily in many areas. Allow each coat to dry before applying a second. I have found that there is a need to apply 2 or 3 coats to achieve an opaque area. When completely dry, have some fun with free motion machine embroidery using rayon and metallic threads on its surface and sew on some glass beads and add sequins as well. Cut out several free form shapes. Make some with curved smooth cut edges and others that are saw toothed and deeply fringed. Keep in mind that Tyvek may shrink to a fraction of its original size once heat is applied to it. Heat a dry iron to wool setting. Fold the parchment paper in half and place a Tyvek piece between the 2 layers. Working on an ironing surface, float (barely touch the parchment paper with the hot soleplate of the iron) over the Tyvek for a few seconds and remove. This will produce interesting raised bubbles and craters with varying color concentrations. Reapply heat by floating the iron over the parchment paper again for a longer period perhaps and see what results this gives you. Take other pieces of painted Tyvek and hold them with a long tweezers or hemostat. You do not want to burn your fingers. Using an embossing gun and a heat shield covering your work surface such as an ironing board, apply heated air to the Tyvek. I usually move the heat gun in quick circular movements over the Tyvek keeping about 2" off the surface. You will get different results if you heat just one side as opposed to applying heat to both sides alternately. The incredible curling and warping of each shape is unplanned and not very controllable. Through experimentation you will discover for yourself how best to apply heat and for how long in order to obtain certain effects. Depending upon the size and shapes of your Tyvek pieces you can incorporate them into your work as embellishing elements or as complete surfaces of a costume or assemblage. Let your spirit and imagination take you on a journey of discovery. Please share with us your own hints, techniques and samples of your experimentations. STEP by STEP INSTRUCTIONS 1- I place a few different sheets of various types of Tyvek on a protected surface. Using a 1" sponge brush I spread metallic color of my choice over the surface of some sheets and different colors over other sheets. Do this quickly and don't brush over wet paint as that paint seems to lift up and gives bare spots. Allow to dry thoroughly. 2- Flip the painted sheets over and paint those and allow to dry completely. 3- You may need to apply a second or third coating. 4- Variations: You may paint the Tyvek surface with a myriad of colors in a mottled effect on one side of sheet and paint the flip side with another color. You can create patterns, dots, stripes, and drawings too. 5- You certainly may use the non metallic colors to paint the Tyvek with as well. 6- Cut out shapes of colored Tyvek and morph them with the heat gun or with the dry iron to create wonderful and imaginative textures and shapes. You can make beads out of the Tyvek that's been colored as well. Roll rectangle shapes or long triangle of colored Tyvek around a plain wood chopstick, metal or wood skewer & apply heat gun. 7- The metallic paints when heated will often have surfaces that change in the heat process and some areas you will see appear to have granulated and look as though teeny glass/no hole beads were glued to the surface. I love this result. Go ahead and play. This is FUN! There's wise advice to do this in a well ventilated room due to possible fumes given off by heating Tyvek... I strongly suggest you do this or experiment out doors when heating the Tyvek. BIBLIOGRAPHY Surfaces for Stitch by Gwen Hedley published by B T Batsford, London, |
|||||||||
|
|||||||||

|
|||||||||