Directions:
Please read thru entire pattern before beginning…Body and side leaf pattern are templates…Trace on to freezer paper…cut out
Click HERE for Pattern (PDF File)
With right sides of fabric together, iron freezer paper template on to fabric…stitch around body piece leaving open at top “neck”…clip curves and turn and lightly stuff…
Iron freezer paper template for leaf sides on to double fabric, stitch all the way around leaf…repeat…make a whole of about 3/4” at top of each leaf turn….stitch closed once turned…
Dip side leaves into mod podge or paverpol…run thru fingers to get excess off…set a side to dry on tin foil…you can sort of move them around or put tin foil under parts to give them movement…paint mod podge or paverpol on to front and back of body…let dry…glue one leaf to the back of body…and the other one to the front of body…matching “dot” to “dot”…
Make 4 fabric yoyo’s and then cut 3 circles from yoyo pattern and turn under edge as if making a normal yoyo however stuff it and pull thread tightly and tie off…this makes berries…cut head piece out of cardboard, quilt batting, felt …add 1/4 “ to the pattern for head piece and cut it out of the red fabric…do a running stitch around the fabric head piece circle…lay quilt batting on cardboard…then put red circle and gather around them it will gather up behind and make the front smooth…then secure the thread and glue the felt piece over the back to make it nice and pretty…
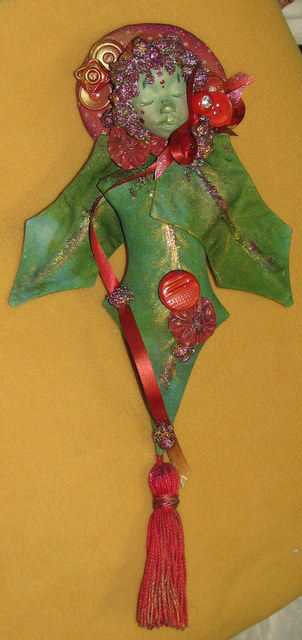
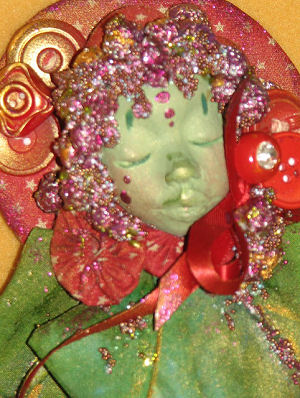
 Next you will glue the mask (which I painted solid green and traced the eye lid with a pigma brown pen and then put blush on cheeks) on to the neck…and the berries will go behind just peeking out around the head back…at the top part…the yoyos will go one under the face and one on each side of that so you more or less circle the head…let glue dry…then glue head piece circle to the back of head and upper body…see pic for how much shows all the way around the head…let dry…next make tin foil balls…all sizes from small to about the size of a pea glue them on hair area…let dry…next paint them with gold paint just dabbing not worrying about covering them…let dry Next you will glue the mask (which I painted solid green and traced the eye lid with a pigma brown pen and then put blush on cheeks) on to the neck…and the berries will go behind just peeking out around the head back…at the top part…the yoyos will go one under the face and one on each side of that so you more or less circle the head…let glue dry…then glue head piece circle to the back of head and upper body…see pic for how much shows all the way around the head…let dry…next make tin foil balls…all sizes from small to about the size of a pea glue them on hair area…let dry…next paint them with gold paint just dabbing not worrying about covering them…let dry
Glue ribbon trailing from neck to bottom point of body letting it sort of flow…make a bow and glue at side of head (see pic) glue tin foil berries in center of bow and trailing down ribbon…let dry
Glue yoyo on bottom leaf body… and glue 3 buttons at top part of head piece then opposite side of head to balance glue 3 more (see pic)
Make tassel…I found about a 4” cardboard wrapped crochet thread about the cardboard about 30 times…tie a piece of crochet thread at the top of wrap…then slip off cardboard…tie thread around entire piece about ¾” from top….wrap and tie and wrap and glue…then clip bottom and it makes a tassel…glue or stitch to back of point at bottom of doll…
Once she is dry totally…I mixed holes beads with grip glue 50/50 this makes a thick paste it will be white…if you use grip glue it will dry clear and only beads will show…trust me…this is a Jean Bernard method…using a tooth pick I sort of filled in between the tin foil berries…and a bit in the center of yoyo’s that show…let dry next mix varnish and the glitter together 50/50 again and using an old paint brush, brush over the berries and yoyo’s…I then mixed a green glitter with varnish and made the line down the center of the leaves…also a bit of green on berries and both glitters on tassel…I made a hook for the back of the head piece to hang her by…
Happy Holidays and Hope you have fun!
Click HERE to find more cloth doll patterns by Sherry Goshon |


 Next you will glue the mask (which I painted solid green and traced the eye lid with a pigma brown pen and then put blush on cheeks) on to the neck…and the berries will go behind just peeking out around the head back…at the top part…the yoyos will go one under the face and one on each side of that so you more or less circle the head…let glue dry…then glue head piece circle to the back of head and upper body…see pic for how much shows all the way around the head…let dry…next make tin foil balls…all sizes from small to about the size of a pea glue them on hair area…let dry…next paint them with gold paint just dabbing not worrying about covering them…let dry
